|
On this day... Below you will find details of where the ship was on 19th May each year. Where the year in the first column includes the word 'details' in brackets, you can click this link to access a full transcription of Hood's log for that date.
For further details why not visit our Timeline which describes in details the ship's career from 1920 to 1941. Or, if want to check when she was at a particular place or where she was on a range of dates then our ship movements database is worth a visit. Forthcoming events Sunday19th May, 2024 Saturday 25th May, 2024, Sunday 26th May, 2024 Friday 24th May, 2024 H.M.S. Hood and the Hood Association - find out more! Many films films have been made about Hood over the years. Some of these, as well as some recent presentations to historical interest organisations, are listed below. To find out more about the ship and the Association, you are invited to explore these fascinating productions.
To commemorate the tragedy of the mission Vice-President Rob White has produced a 30 minute film: "Duty Before Honour". Featuring veterans from both sides and footage donated by independent filmmaker Andy Poulistades, it explores the history of those sad days and is a testament to the men who were lost. Their families are now represented by 'L'association des anciens marins et familles de Mers-el-Kebir'; Herve Grall, their last president whose father was lost at Mers-el-Kebir, actively sought to build links with our Association in the years following, as a mark of conciliation and reconciliation. 'HMS Hood Mighty then, Mighty now' (Film) Commissioned by the Association to mark the 80th Anniversary of her loss this film describes why Hood was so significant to the inter-war generation and how her loss still resonates today. (May 2021) 'For years unseen' (Film) Commissioned by the Association this film tells the story of how Hood's bell was recovered from the wreck and returned to Portsmouth to be displayed at the National Museum of the Royal Navy.(2017) 'The HMS Hood Association' (Talk) - Cdr William Sutherland (Chairman), Rob White (Vice-President) (Presentation to Orkney International Science Festival, May 2021). Iconic Ships - HMS Hood As part of their 'Iconic Ships' series, The Society of Nautical Research released through its Mariner's Mirror Podcast facility, a presentation by the late Professor Eric Grove who makes the case for Hood as an 'iconic ship. HMS Hood, Last of her Kind' (Discussion) - RAdm Philip Wilcocks (President), Rob White (Vice-President), Cdr William Sutherland (Chairman), Cdr David Hobbs (naval historian), Mr Graeme Lunn (naval historian.) (Presentation to Orkney International Science Festival, May 2021). Question and Answer Session about finding Hood's wreck and recovering her bell - David Mearns (Vice-President), Rob White (Vice-President), RAdm Philip Wilcocks (President), Cdr William Sutherland (Chairman), Cdr David Hobbs (naval historian), Graeme Lunn (naval historian). (Presentation to Orkney International Science Festival, May 2021). Own a replica 15-inch Hood tompion! A "tompion" was the metal cover placed over the end of Hood's guns when they were not in use and which prevented sea water entering the barrels. Thanks to the amazing work of Andy Poulastides, the H.M.S. Hood Association is now able to offer replicas of the tompions which were used on Hood's main 15-inch guns. These will be strictly limited to 51 tompions (Hood's pennant number) and are not only items of great craftmanship and beauty but are highly likely to prove an excellent investment. For the full story behind the making of the tompions and to find out how you can reserve one click here to read Rob White's report (originally published in the summer edition of The Chough.) together with a gallery of photos showing the stages of manufacture of these remarkable items. A "tompion" was the metal cover placed over the end of Hood's guns when they were not in use and which prevented sea water entering the barrels. Thanks to the amazing work of Andy Poulastides, the H.M.S. Hood Association is now able to offer replicas of the tompions which were used on Hood's main 15-inch guns. These will be strictly limited to 51 tompions (Hood's pennant number) and are not only items of great craftmanship and beauty but are highly likely to prove an excellent investment. For the full story behind the making of the tompions and to find out how you can reserve one click here to read Rob White's report (originally published in the summer edition of The Chough.) together with a gallery of photos showing the stages of manufacture of these remarkable items.
|
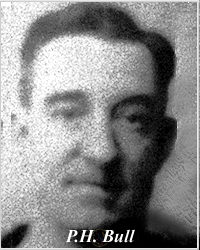
Memorials to Hood's lost The memorial pages to the men lost will always be the central part of this web site. Below we feature two of the 1415 men lost with the ship - one for whom we have a photo and the other for whom we do not. You can find out more about the men who died in the sinking of the ship by visiting our Roll of Honour page
Sadly, for 367 of the men lost with the ship we have no photo.Do you have local knowledge or contacts which would help us reduce this number? Please visit our Casualties by county page to find out whether we still need photos of men who came from close by where you live.
Updates to crew pages
| ||||||||||||||||||||||||||||||||||||||||||||||||||||||||||||||||||||||||||||||||||||||||||||||||||||||||||||||||||||||||||||